Saturday, June 20, 2009

Intel's New CPU Naming

Well, plucked this from Anandtech showing how Intel is going to market their upcoming Lynnfield and Clarksfield processors in both the desktop and mobile segments.


Interestingly, Intel plans to start segreggating their products based on performance into three categories; good, better, best (there is no bad/average in Intel haha). This categories will then be labeled as Core i3, Core i5 and Core i7 respectively. So, let's say you plan to buy a new PC/laptop soon, how do you know which you are getting? Anandtech has done a good summary with the below tables:

Desktop ProcessorCoresThreadsTurbo
Intel Core i748Yes
Intel Core i52 or 44Yes
Intel Core i32 or 44No

Mobile ProcessorCoresThreadsTurbo
Intel Core i72 or 44 or 8Yes
Intel Core i52 or 44Yes
Intel Core i32 or 44No

With the above, we can clearly see the performance gaps betwwen each category. The Core i3 lineups are the ones with no HyperThreading and no Turbo Mode to temporarily boost when less cores are utilized. The Core i5 will have Turbo but with no HyperThreading and finally the Core i7 with both features turned on thus having the best performance of all.

This goes against what I believe some of you have concluded that Bloomfield or Socket 1366 will be maintained as the Core i7 and that the new Lynnfield processor will be marketed as Core i5. Because Intel chose not to use QPI link and number of memory channels as comparison, it basically means that the Core i7 will be a mix of both LGA-1366 and LGA-1156 sockets. To differentiate, we have the sub categories:

Core i7 9xx Series - LGA1366
Core i7 8xx Series - LGA1156
Core i5 6xx series - LGA1156
Core i3 5xx Serie - LGA1156

There is no talk about what socket Clarksfield will be using though it is rumored to be using a totally different socket compared to Lynnfield. This is going to complicate the marketing further I think.

Anyways, whether this is the right strategy or not, I believe it will vary from each person's perspective. I mean previously, if I see a core 2 Quad or Core 2 Duo, I know I'm getting a quad core or dual core CPU respectively and its all about choosing the GHz. Now, I have to worry about what socket the CPU I'm getting is using and will it be compatible with my current hardware. Big headache to plan my upgrade path now :S

What you guys think?

Cooler Master 90CFM fans upgrade

It's been a few days since my last post. If there were any readers out there, sorry for that. I had been pretty busy at work and preparations for my relocation to US by Intel. coincidentally, it was also because of these preparations that I had the opportunity to get my hands on the Cooler Master 90 CFM fans I've being eye-ing for awhile.

Cooler Master 90CFM Fan

I was in KL this morning to attend my US Visa interview. Basically everything went pretty smoothly and I had plenty of time left before heading back to Penang. So naturally, I had to make a pit stop at Low Yat first hehe. Walked around and found Sri Computers to be the only one carrying this fan model (or maybe I did not search deep enough) and also for a nice price of RM28. I found these fans selling in Penang as well but they will usually be priced at RM35. So I made a few calls back to see if anybody else needed them and in total I bought 7 of them :)

Here's the breakdown:
1 for SC's build (blue)
3 for another colleague (blue)
3 for myself (red)

Once I reached home and had dinner (about 9pm) I started to fixed up the new fans and try out the cooling improvements and visual effects I will be getting. So checkout the below sequence of blue/red fan comparison, before/after photos, some cable management shots and much more.

Red LED version

Blue LED version

Blue vs Red comparison. Notice the blue has brighter LEDs than the red.

Old set of radiator fans that have been serving me for the past year. Bye bye to them :)

Picture of radiator with current fans

Radiator with new CM fans

PC before fan change

After

Cable management behind motherboard tray. Much work still to do here. I'm planning to sleeve all the wires to make all of them an uniform black and do a much better cable tie cleanup. But it still looks pretty decent the way it is doesn't it? (Self praising haha)

Dark room shot through casing window (would be alittle more impressive if taken with a better camera). Not much to see from this actually. Future mod in plan is to cut a larger side window especially after internal paint job and liquid cooling for graphics, north/southbridges are in place. Water loops are meant to be shown off!

Lastly, a small comparison of cooling improvements with the new fans. With the very quite operation of the fans, I was allowed to power them up with 12V compared to the last set of fans due to noise levels. Also, with the high 90CFM rating, pressure is on that this fans should perform much better than my brandless cheap fans. However, for me, cooling improvements are not the primary reason I wanted to purchase these fans. My main goal is to maintain my current low noise level and at the same time, improve the overall look of the PC in accordance to my red coloured theme.

The results:

Temps before

Temps after. A 2C drop for the CPU and an overall 1C drop for all hardware in my case. This shows that the CM fans have increased the exhaust rate of hot air from the top which allows the negative pressure created internally to bring in cooler air from outside at a faster rate. Very satisfying results.

That's all folks! Hope you enjoyed the read and stay tune for my next posting on updates/benchmarks with SC's build. See ya!

Tuesday, June 16, 2009

8800GT Overclocking with Voltage Mod

Well, after my power consumption check in one of my earlier post, I'm very much keen to go back to pushing my PC's limits since I know it's not the main culprit of my high electricity bill hehe.

Since the beginning, I've pretty much concentrated on overclocking the CPU. I felt more comfortable doing that because I know I have more than adequate cooling on it with the Swiftech water cooling setup. I was getting about 32C with air-conditioning and about 38C at room temp which was very very good in my perspective. The first processor I got from Intel and into this system was the QX6700 (Kentsfield). I was able to push it to about 3.6Ghz from its stock 2.66Ghz. That was using nearly 1.45V and temps was reaching 45C at idle. I really want to hit that sweet 4Ghz spot.


QX9650, 45nm Yorkfield

I have since swapped the Kentsfield for a newer QX9650 (Yorkfield 2.93Ghz) processor. Using FSB overclocking, the highest I got was 3.9Ghz. The moment I tried 400Mhz FSB or higher, the BIOS just would not boot and it will default all settings back. I checked around in the forums and found out that my board, the Foxconn X38A, had significant FSB hole issues which varies from customer to customer. For my case, the hole was at 400Mhz. I do not know if there are any passing regions above 400Mhz bsince I did not try pushing blindly passed it. Foxconn has also appeared to have stopped updating the BIOS for this board to improve on overclocking (I'm never buying Foxconn again) So I went with multiplier overclocking instead. Using the mobo's recommended voltage setting based on the multiplier number you chosed, it took me only 10 minutes to climb from a ratio 9 to a ratio 12 effectively bringing me to 4.0Ghz. Voltage required was a low 1.375V :)

Anyways, back to what I really want to talk about, my graphic card overclocking experience! The Galaxy 8800GT that I own ships with all it's clocks at default NVidia stock settings: 600Mhz Core/1500Mhz Shaders/900Mhz Memory. My original card was defective after a few weeks (would not show BIOS but ok in Windows) and I got it replaced while under warranty. At that time, Galaxy had already revised it's 8800GT lineup and offered it in two new configurations; one with a Zalman copper heatsink and the other with a dual slot covered cooling. Both had 2 6pin connectors at the back instead of the regular 1 for all 8800GTs which Galaxy said is supposed to improve voltage stability for overclocking (cool!). Here are the cards:


The dual slot cooling version


The Zalman spiral copper heatsink version

What I ended up getting was the two slot full cover version. Though I was pretty pissed since the Zalman version looks much cooler and probably cools way better anyway but I soon had a change of mind. Remember when I said that these cards gave you option to connect two 6-pin power from your PSU? Here is why: The card comes with its on 3-phase voltage mod jumper! By changing the position of the jumper from it's two positions or removing it totally, you get to decide 3 different core voltage the card will be getting. Good news since no more solder gun or wires needed to volt-mod this card.


Observe the yellow colored jumper located at the end of the card next to the dual 6-pin connectors.

However, I did not try the jumpers partly due to worries of total system consumption but not anymore haha. However, found out that Rivatuner, the popular tool for Nvidia & ATI GPU overclocking, is not able to recognize the drivers I have installed. Though I was able to force it to recognize the driver version, I just won't be able to trust the overclocking done by it. So, looked around and found another cool tool to get the job done. Introducing, EVGA Precision software. Too bad it only works for NVidia cards.


EVGA Precision

Armed with 3DMarkVantage, here are the overclocking results. I slowly increased the core clocks with increments of 10Mhz each with shaders unlinked. I did not hit any issues midway and stopped at a healthy 685/1680/950 configuration for my first benchmark.


Do note that at stock clocks, the 8800GT gives about 5,200+ GPU scores. Here we are seeing a 5,552 GPU score. A nice 6.7% increase. Also, the test completed without any errors or freezes indicating the card is still stable. Temps measured during benchmark (thanks to EVGA Precision's added feature to display on-screen real-time GPU temps) was steady at 70C. Stock cooler is holding on it seems haha

Let us continue. Next stop: 690/1680/960 (increase in core and memory clocks)


Did not see much increase in with a 5,571 score so time to take a more aggressive approach. I linked the shaders to the core and increased the memory clocks to hit a nice 1000Mhz(Galaxy uses higher rated Samsung chips known to hit 1100Mhz which can perform better compared to the usual Qimonda memory). Benched at 700/1750/1000 clocks:


Now we're talking. GPU scores have hit 5,792 here. Thats a full 500+ points increase over stock values. For the final bench, I increased the core clocks another 10Mhz for a final configuration of 710/1775/1000 and Oced my CPU back to 4Ghz (I went back to default temporarily for the power consumption analysis). This is where my PC currently stands:


In summary, I've managed to squeeze an extra 13.15% of performance from my card with the voltage mod (Final GPU score of 5,884 vs stock's 5,200). I know my card cannot hit 700Mhz without problems when I tried last time and that has been solved with higher voltage provided to the chip. However, the card temps are now hovering dangerously near the 80C limit I set for myself (I just don't like to see high temps on any of my parts) and started to show artifacts on ATITool around that temp. However, if I were to water-cool the card or perhaps get the Accelero cooler, I could actually push the clocks even higher :)

Anyways, that's news for another day. For now, I'm just gonna enjoy my extra graphics boosts with some games (let me see how much better frames I get in Crysis hehe). Some closing pics showing improved Windows rating before/after OC. Bye guys!

Graphic score of 5.9 before OC

Graphic score of 6.1 after OC

Saturday, June 13, 2009

Broken Hard Disk

My hard disk has been faulty for a couple of months now and I've been delaying on what to do until recently it started to crash my OS after 10-15mins of use (worse when I try opening a movie or starting a game).

The faulty drive

So, what happened to my Seagate drive? First, it started to make some pretty weird screeching sounds when it's on high activity. Then it started to show signs of failure during boot up. My BIOS would pick up the S.M.A.R.T readings from the disk and reported that the hard disk had a BAD status. At first I ignored it but apparently I had to hit the F1 button to proceed with boot up each time and it was annoyingly happening more and more frequently. Especially when your PC makes a smart move of updating your OS and rebooting and then you wake up in the morning to see it stuck at that BIOS. Practically a whole night of torrent-ing wasted.


Windows has also frequently popping up warnings of a faulty disk and recommends me an option to back it up and get a replacement as soon as possible but I simply chose to ignore it at first. I mean, after all I'm still able to boot to my Windows and do what I wanna do just as usual, caveat the few annoying stuff above. But recently, just as I stated at the beginning, it has taking it's vengence to a whole new level; crashing my OS to make sure I can't ignore this issue any longer as it is impeding my normal usage. :(

So, during lunch time, went over to Queens Bay Mall top floor and got me self a new 640GB Western Digital Caviar Green. The shop there was known for high prices and they did sell me the hard disk for RM219 which is about RM5 higher that PC Depot's price (PC Depot used to have very bad service and high prices but seems to have improved alot recently). Ironically, when I was building my PC, I was recommended by my friend to get a WD but I stuck with Seagate cos it was cheaper at that time. As you can see, I'm not gonna do the same mistake twice after what happened.

Anyways, my OS is now happily running on the new hard disk with no issues (let's hope it stays that way) but what I really want to share with you guys is how to check for your hard disk warranty and get a replacement drive for your faulty one. I do not know about Samsung and Hitachi but for Seagate and Western Digital, they allow you to check on the current warranty status of your drive at anytime through their website.


So I went over to the site and checked on my drive's warranty. Bought it in 2007 so let's see what Seagate says. Typed in my Serial Number and Model Number (click for larger image):

If you're wondering where to get the Serial and Model numbers from, they are on your hard disk top label. I also noticed a suspicious "Certified Repaired HDD" line added on the label as can be seen below. Did I get scammed into buying a refurbished drive from the beginning? Hmm...

The Serial and Model numbers

And the warranty check results (click for larger image):

Apparently Seagate was kind enough to provide a 5 year warranty for their drives. The above shot shows my drive's warranty is valid till Aug 2012. This is different compare to Western Digital's 3 years . With Seagate's drives falling off so easily, it's good thing they are giving longer warranties to keep their customers satisfied otherwise sure kena complain teruk teruk :P

The next step would then be to RMA my drive to get a replacement. I'm going to try do it all online. I did not want to create an account with Seagate yet so I chose to return the product as a Guest. This is the link I went to: https://store.seagate.com/webapp/wcs/stores/servlet/SgCheckWarrantyView?langId=-1&krypto=lZV0ifY90uy6PUbeNYxmlJ/eOamQTU8vX/yVcskL7Ra8YMmV34QjfaXbpO6NlvwR%2BTEC3tVdnhJ0%0AtmaQWKyGUNscSUkjrgNNSrX6sZWZFxPTN7qiNOvGlw%3D%3D&ddkey=SgSSORedirect
You'll have to fill up the Serial and Model numbers again and then enter your shipping address.

After I have finished the entire process of filling up some simple forms, Seagate basically provided me the address I should ship my hard disk to and also my RMA number so I can track the progress of my replacement. Of course this means I will have to bear the cost of delivery myself though the return will be covered by Seagate. I wonder if there is anywhere in Penang where I can do a walk-in RMA to avoid this cost.

Return address sample label (if you're wondering about the grey lines, it's cos I greyed out my address :P)

Seagate also provided instructions and specifications for the packaging because if it does not aligned with Seagate's requirements, they will void the warranty and blame the defect on the possible en route shipping mishandling :S
If you want an idea of how its like: http://www.seagate.com/support/service/pdf/pack.pdf

So I hope this helps some of you and excuse me while I go hunt for ESD packets and empty boxes.

Thursday, June 11, 2009

Lynnfield Beckons!


As we get nearer and nearer to the imminent Lynnfield (aka Core i5) launch, more and more leaked news and benchmarks are starting to hit the internet. So I thought it would be nice to track a timeline of the more significant milestones/news of this product since my team is partly working on it too :)


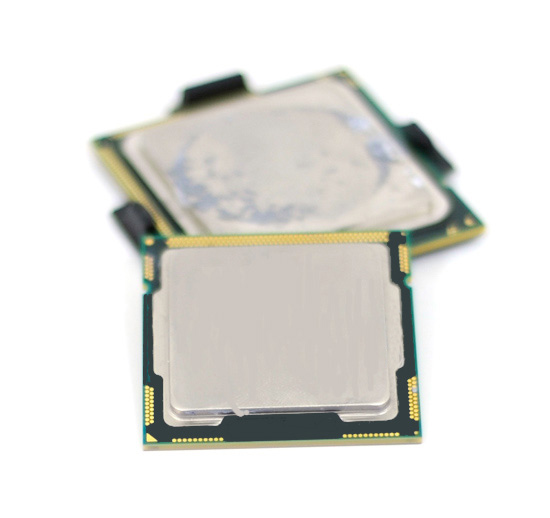
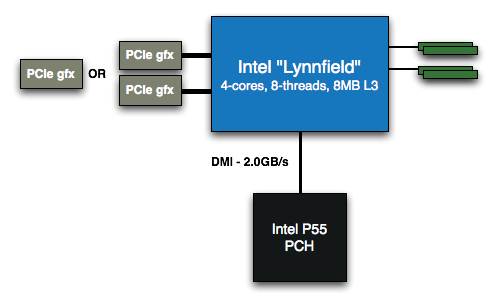
Last year in October 2008, a website released the first ever Lynnfield processor shots to the world. It compared the pin layout and substrate sizes between the 3 latest generations of Intel processors, the Yorkfield (Core 2), Bloomfield (Nehalem) and the Lynnfield (Nehalem) in a series of pictures. Technically, Lynnfield and Bloomfield share the same achitecture basics, but Lynnfield will be the first platform that will fully integrates the whole Northbride on die. In Bloomfield, only the memory controller portion was integrated and the Northbridge was still needed to handle the PCIE connections. Check out the pictures from here http://images.google.com/imgres?imgurl=http://xtreview.com/images/lynnfield-processor-LGA-1160-01.jpg&imgrefurl=http://xtreview.com/addcomment-id-6579-view-lynnfield-processor-vs-bloomfield.html&usg=__JgCpB503Pks4e02vcmqQZT6FFlk=&h=307&w=600&sz=50&hl=en&start=8&um=1&tbnid=TwElCOXEYBfu2M:&tbnh=69&tbnw=135&prev=/images%3Fq%3Dlynnfield%26hl%3Den%26sa%3DN%26um%3D1


Then I remembered when the first becnhmark on SuperPi, FRITz Chess, Cinebench and CPU score in 3DMarkVantage was released from some Chinese website showing a Lynnfield 2.13Ghz around December 2008. On every site that I visited, all cautioned againts using the numbers to conclude anything as the processor and the motherboard was still in its very early stages. Link to news: http://xtreview.com/addcomment-id-7237-view-Intel-Core-i5-Lynnfield-benchmark.html


Only recently, Anandtech did a more comprehensive 11-page review with gaming benchmarks of a engineering sample with a not so complete Turbo Mode enabled. According to Anandtech, Lynnfield will have multiple Turbo Mode options based on how many cores are currently in used. When 3 cores are used, Lynnfield is able to shut down the extra core and divert the extra power to boost the 3 remaining cores for an extra 200Mhz. Thats great right? Wait, there's more. Moving to two cores, the same feature will boost the remaining two cores for 400Mhz and finally, at one core, an amazing 600Mhz increase in clock speeds! I like this feature alot.

Model NumberClock SpeedCores / ThreadsMaximum Single Core Turbo FrequencyTDPPrice
?2.93GHz4 / 83.60GHz95W$562
?2.80GHz4 / 83.46GHz95W$284
?2.66GHz4 / 43.20GHz95W$196


So if you games need raw processing speed, you get it with the Turbo Mode. Need multi core processing? No problem, Lynnfield has 4 cores to provide. You indeed get the best of both worlds with this processor. In short, we could say that Lynnfield will be the first CPU that is very optimized for both single threaded and multi threaded games.

Ofcourse then the next question is, how much will it cost? Anandtech also provided much valuable information about the Lynnfield's estimated position in the market and the launch prices for the different offerings

NameManufacturing ProcessCoresTarget MarketRelease
Gulftown32nm6High End Desktop1H 2010
Core i7 (Bloomfield)45nm4High End DesktopQ4 2008
Lynnfield45nm4Performance DesktopQ3 2009
Clarksfield45nm4High End MobileQ3 2009
Clarkdale32nm2Mainstream DesktopQ4 2009
Arrandale32nm2MobileQ4 2009

ProcessorPrice
Intel Core i7-940 (2.93GHz)$562
Intel Lynnfield 2.93GHz$562
Intel Core i7-920 (2.66GHz)$284
Intel Lynnfield 2.80GHz$284
Intel Lynnfield 2.66GHz$196
Intel Core 2 Quad Q9650 (3.00GHz)$316
Intel Core 2 Quad Q9550 (2.83GHz)$266
Intel Core 2 Quad Q9400 (2.66GHz)$213
Intel Core 2 Quad Q8400 (2.66GHz)$183
Intel Core 2 Quad Q8200 (2.33GHz)$163

Interestingly, Intel decides to sell the lowest end Lynnfield part (2.66Ghz) with HyperThreading disabled. I think this is partly due to it being priced lower than the i7-920 because with the Turbo Mode of the Lynnfield, the performance will easily beat the 920 thus there is no reason for end-users to purchase the higher-priced i7-920 then. The same goes for the i7-940 as the aggressive Turbo Mode will blow the i7 out of competition anyways. The only advantage the i7 has left is if the user is looking for high memory bandwidth and triple channel memory as well as full x16 dual PCIE lanes

However, there are also rumours that Intel might withdraw the lower i7-920 totally in order to draw a proper line between it's high-end and mainstream products. This is actually very bad news for fans of the i7-920 as this part has been one of the most overclockable processor especially with the D0 stepping, easily surpassing the 4Ghz mark. If Intel indeed withdraws it, fans of the high-end market will have to settle with higher priced i7-965s and 975s. If you've been thinking of building a i7 PC for awhile now, better do it sooner than later.

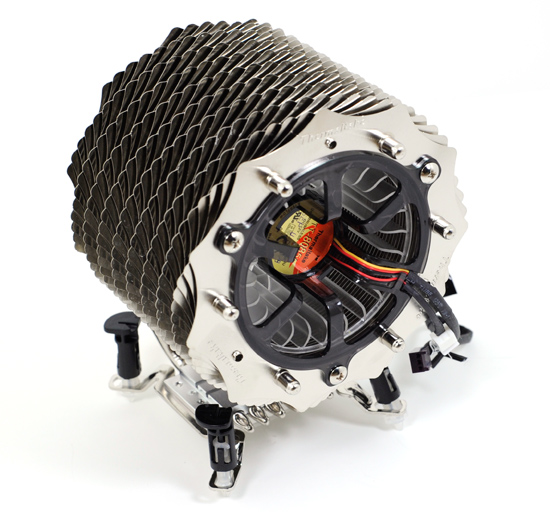
Anandtech also introduced one of the early CPU cooling offering from Thermaltake for the Lynnfield processors, the Thermaltake Spin-Q. I think anybody that eventually buys this should keep a few plasters in hand during installation lol.


Since Lynnfield is going to use a different LGA 1156 socket, you will not be able to re-use existing Bloomfield coolers due to the difference in the motherboard socket hole widths. However, the Thermaltake solution above comes with adjustable push pin position making it suitable for both Lynnfield and Bloomfield motherboards. But if you ask me, push pins are a nightmare to work with. Gimme screws and springs anyday.

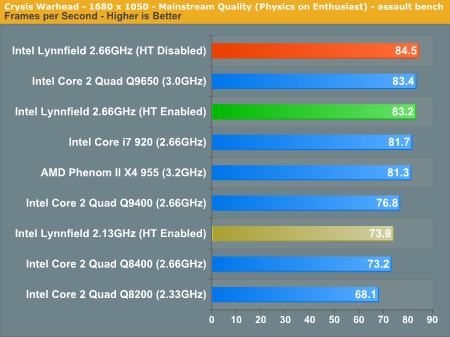
The gaming benchmark shows that the Lynnfield is pretty much on par with a i7 at the same frequency and even leads it in some games. This was all with a crippled Turbo Mode unit that Anandtech was using. It will be very surprising that Lynnfield should not be able to extend that lead further when retail units start shipping with fully functional Turbo Modes. Crysis bechmark below:


Anyways, there are more pictures and plenty more additional info from the full review. Check it out at http://www.anandtech.com/cpuchipsets/showdoc.aspx?i=3570&p=1
I especially liked their closing statement : "Penryn was always good, Bloomfield was nice to talk about but Lynnfield may end up being the one you marry." :P

And in the recent Computex, one slide from Intel pretty much sums up the performance of Lynnfield compared to my current QX9650 processor:


Computex also became the place where motherboard manufacturers were showing off their brand new P55 motherboards that will support the Lynnfield processors. Amongts the usual suspects are the Asus, Gigabyte, MSI, Foxconn, Asrock & DFI. Take a look at Gigabyte's new board! I can only wonder how many PWM phases its packing for its power supply around the CPU.


And finally, one of the news that I just read about today. Some Taiwanese motherboard company (guess who?) has reportedly stated that the Lynnfield processors will be a absolute dream to overclock. It seems early samples sent to them was able to hit 5Ghz....on air cooling!
Though this might just be rumours, but it's sure adding more hype to this potentially exciting product. Read the short article at http://www.bit-tech.net/news/hardware/2009/06/03/lynnfield-overclocks-to-5ghz/1

Let's see if Lynnfield will really take the world by storm. What do you all think?

Wednesday, June 10, 2009

How much electricity are you really using?


Have you guys ever wondered how efficient is your PC? 

When I started to get into overclocking and gaming, I was happily increasing my voltage to hit that satisfying 4.0Ghz speed. Seeing the 3DMark06 score jump by 400 points after overclocking my 8800GT was really exciting. Gained 4 fps in Crysis and I was already the happiest guy for the day.
Until the electricity bill came of course.

I never actually considered how much power my PC would be using but I bet the hours of Priming I did must have contributed something to it. So now I'm in a dillema. On one hand, I already have my system water cooled and it's begging to be overclocked but on the other, get nagged everyday by my mom for the increased electricity bill. Not a nice place to be at all.

So I went about to find some sort of measuring device so I could divert my mom's attention and hopefully able to blame some other faulty thing for the high electricity so she would leave me alone to continue OC my system hehe. It took me pretty long time and I just could not find any sold in PG or in Malaysia. Of course there are those so called plug-ins to the wall socket that supposedly able to cut down your electricity cost immediately but I chose not to trust these items partly also because it costs alot to find out if it works or not and that alone has already offset whatever savings you might be able to get from it.

Back to the topic, in US they have the pretty popular Kill-A-Watt (you can google it and you'll find many places selling them) but again, not offered here. There is also a problem of socket compatibility since the US pin layout is different. You would need a converter for the device and another for your application to plug into the device. Inconvinient and bulky I would think. To cut the story short, I went to ebay and did some search and found a few different models from UK. Apparently the UK uses the same socket layout as us and that is a definate plus. It also supports the same current and frequency ratings as what TNB is supplying us with. So after thinking a moment (first time buying from ebay and from a seller so far away), clicked the buy button and got it over with. RM80 gone and I waited patiently for it to arrive.

So, item arrived today much to my relieve. It was actually small enough to fit into a sort-of envelope with some paddings inside. I did not take any pictures of the unboxing or packaging because I was just too excited to try it out hehe. There were 3 buttons on the device: "UP", "SET" & "FUNC". The first two supposedly allows you to set the time and program it to even calculate your power cost by providing it with the price per kWh and it will be able to do the rest. Anyways, I skipped all those fancy stuff and basically only used the "FUNC" button. Pressing it will toggle the display to switch thru the typical Voltage, Current and Power(Watts) value. On to the results then!

Make a guess. What do you think is the power draw of my system?
For those who do not know my system specs:

Intel QX9650 3Ghz
Foxconn X38A Motherboard
2x1GB Crucial Anniversary 800Mhz DDR2
Seagate 320GB 7200rpm HDD
Western Digital 640GB Caviar Green 7200rpm HDD
Galaxy 8800GT 512MB GDDR3
Samsung 19" LCD
CoolerMaster M620 620W PSU
Watercooling: Swiftech Apogee GT, Swiftech MCR320 (120.3 radiator) & Swiftech MCP655 Pump

I did the measurement with everything at stock and no OC on any parts.

I first turned on the mains. At this point, PC is powered up but not running yet, mobo lights and PSU lights are on.

9W! I think I could have powered half a Atom PC up already even before I powered up my PC. At this point, it's not looking good at all. I'm so going to be blamed for the electricity cost.

Next, bootup.

Hmm, it's not that bad @ 200W but still, assuming bootup should be around the idle state of the PC, I would assume then that full load when playing games would have to be higher than this

Move on then. I have now start-up my PC and have logged in to Windows. Even during the OS loading and everything, nothing much changed. I was still pretty much stucked at 200W. So I fired up a movie (Madagascar 2) to see what is the power consumption at during one of my movie sessions. To my surprise, it stayed at the 200W level maybe a occasional 2-3W spike now and then but it was still pretty good considering the increase of HDD activity as well as GPU usage. Hehe, no worries for movie sessions anymore!

Now to gaming! Started Left 4 Dead game and let it run its usual opening "2 weeks after initial infection" movie. Started the hospital campaign and this is what I got:

OK. So now we're seeing a slight increase to about 220W. Either L4D was a totally undemanding game or my GPU was handling the game very efficiently. Gaming is usually where we see the graphic card switch to the higher powered 3D mode to help out with all the 3D accelaration and the processor will also get out of it's sleep/idle state. So 20W is not a great increase at all. Good good.

But I just had to know. What is the absolute peak of my PC if it actually went that far. So I opened Prime95 and proceeded to torture test all 4 cores. The result was:

So this is the max draw of my PC. A constant 270W at peak loading (I can only imagine the hours I spend running Prime on it when I first overclocked it and how much power was been used up then :S). Anyways, this is with the CPU maxed out but I'm sure if I perhaps run an ATI tool to stress the GPU, we're maybe talking about 300W then.

Last test. I actually regularly leave my PC on throughout the night to complete my torrent. So just for an idea how much power I'm using that time I measured it with the LCD turned off (don't need it since I'm going to sleep right?)

176W. So my LCD is actually taking 30W of power to display.

So in conclusion, I can see that although the power used during torrent-ing is the lowest at 176W, it is also the one that I used the most. Leaving over night means the PC will be on for around 6-8hrs each time, everyday. Add that to my occasional gaming when I'm awake, we are talking about 185W+ per hour each day for 6-8hrs. That is a total of ~1.5kWh each day. For 1 month, thats 45kWh units of additional cost printed into your TNB bill. Using TNB's very own bill calculator (http://www.tnb.com.my/tnb/tariff/calc.htm), that is a huge total of RM9.80 per month. What?!

I think it's time for me to go back to the world of over clocking and let me find the unfortunate electrical appliance that I'm gonna put all the blame on haha! RM9.80 a month was not a very huge amount and definately not something I should be so worried about. Yay! :)


As always, appreciate the comments. Have a nice day!